RV Pad Gravel: Road Base Depth & Tons for a Stable Pad
A durable RV pad provides stable support for your vehicle and protects your investment from ground moisture. This guide explains what an RV pad is, which materials you need, how to prepare the ground, how to build a gravel RV pad step by step, and how to estimate the amount of gravel required. Whether you are creating a new parking spot for your RV or upgrading an existing pad, use the sections below to navigate through the process.
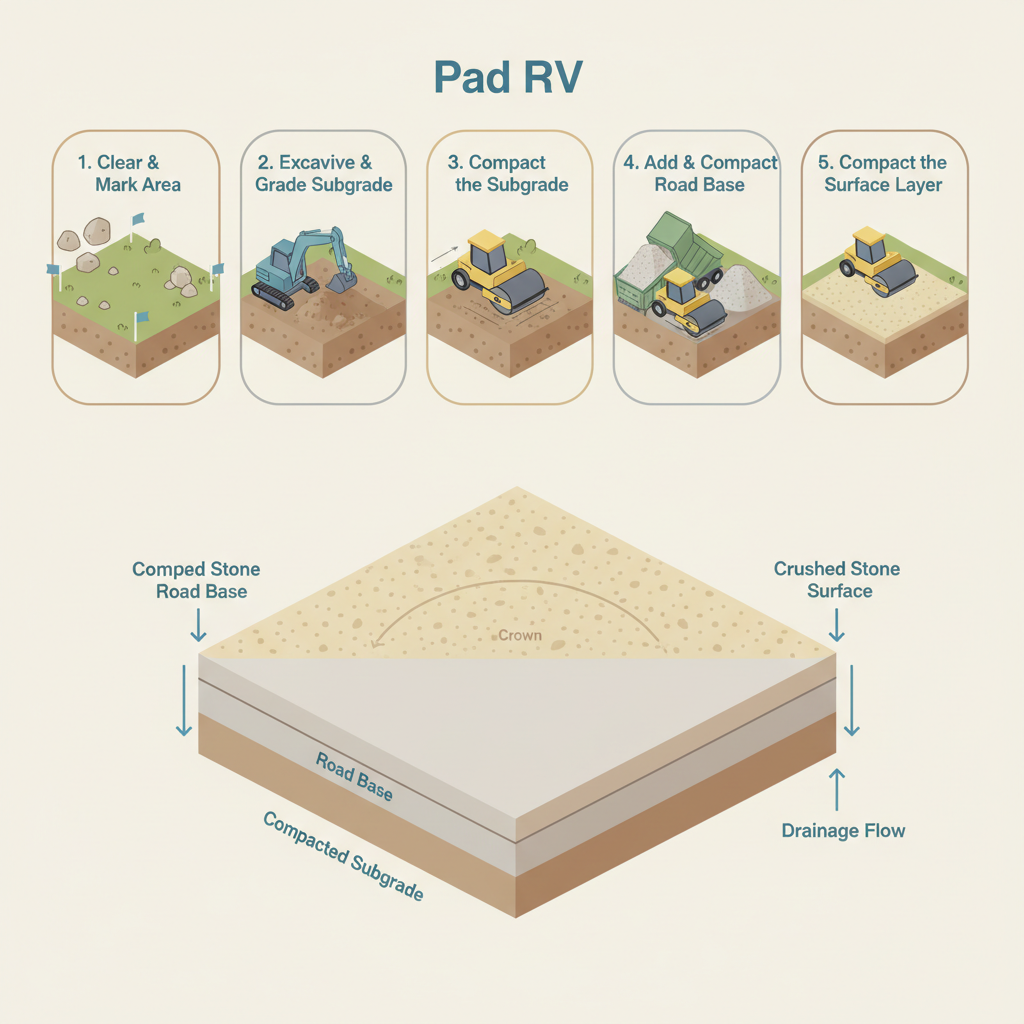
See How to Build an RV Pad
This visual guide walks you through the complete installation sequence for building a durable RV pad. It clearly illustrates each numbered step from site preparation to final compaction, while the layered cross-section shows how the compacted subgrade, road base, and crushed stone surface work together to create a stable foundation with proper drainage.
Gravel for RV Pads: Best Materials, Depth, Cost & How to Build
An RV pad creates a durable, stable parking surface for your recreational vehicle that prevents settling and ensures proper drainage. We recommend using 3/4 inch down to fines crushed stone with a total depth of 8-12 inches to provide the necessary load-bearing capacity. The multi-layer construction with compacted base and proper crown ensures water runoff away from your RV. For most installations, plan for 10-15 tons of material to create a reliable parking area that will last for years.
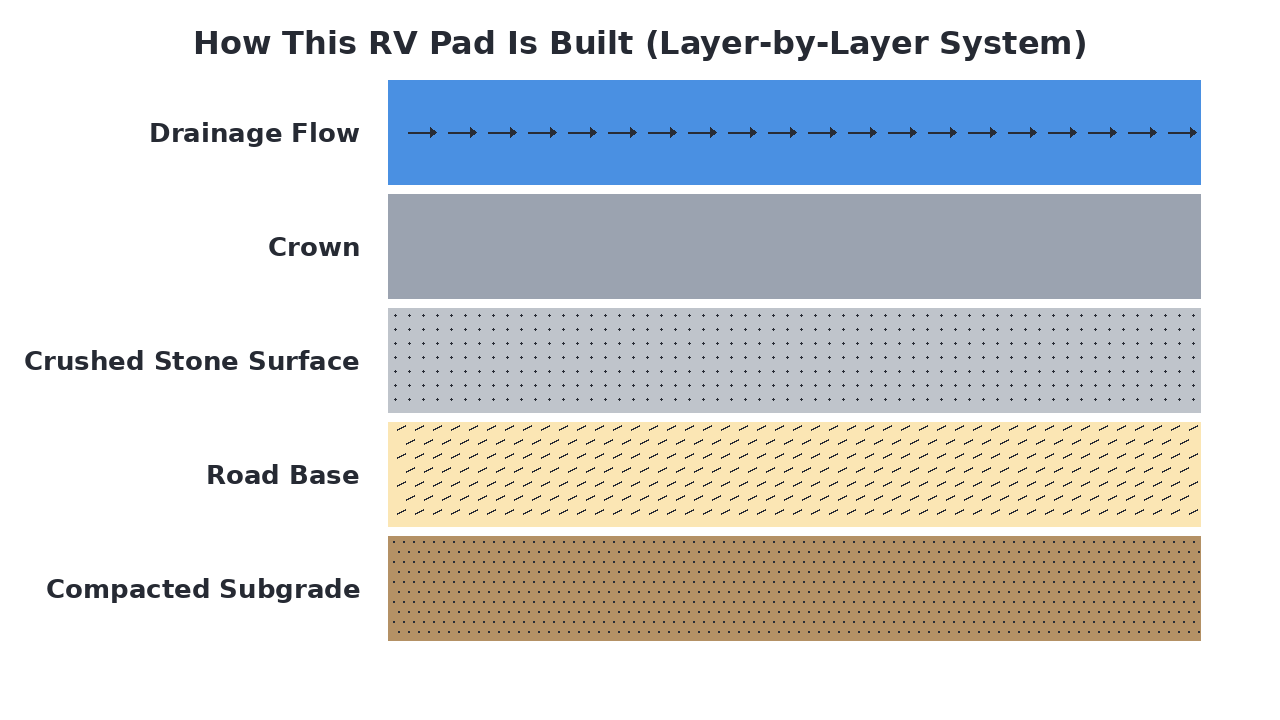
How This RV Pad Is Built (Layer-by-Layer System)
An RV pad is a multi-layered system designed to support heavy vehicle loads while ensuring proper drainage and stability. Construction begins with a compacted subgrade, followed by a load-bearing base layer that provides structural integrity, and a surface layer that creates a smooth, durable parking area. The pad features a slight slope or crown to direct water runoff away from the RV and prevent pooling or erosion. Proper compaction of each layer is essential to prevent settling under the weight of the RV.
Materials Breakdown: What Each Layer Does
An RV pad is constructed as a layered system, where each material serves a distinct purpose to create a stable, durable, and well-draining surface. The compacted subgrade provides a solid foundation, the road base distributes weight, and the crushed stone surface offers a smooth, load-bearing top. These layers work together to prevent settling, manage water runoff, and support the heavy vehicle for years of use.
Compacted Native Soil
The existing soil that is graded and compacted to create a firm, level foundation that resists settling and supports the layers above.
Road Base
A dense, load-bearing aggregate that distributes the weight of the RV across the subgrade and provides structural stability.
View Road Base →Crushed Stone
A durable, angular stone layer that creates a smooth, stable driving surface and helps shed surface water.
View Crushed Stone →Surface Crown
A slight slope built into the surface layer that directs rainwater off the pad to prevent pooling and erosion.
Drainage Slope
The overall grading of the pad that ensures water runs away from the RV and the surrounding area to maintain dryness.
What Is an RV Pad and Why Does It Matter?
An RV pad is a specially engineered parking surface designed to support the heavy weight of recreational vehicles while ensuring proper drainage and stability. It matters because it prevents costly damage to your RV from settling, erosion, or water pooling that can occur with standard parking surfaces. Unlike simply parking on grass or gravel, an RV pad features multiple compacted layers with proper grading to handle concentrated vehicle loads and direct water runoff effectively.
Common Types of RV Pad Systems
RV pads typically come in three main types: gravel, concrete, and asphalt. Gravel pads are the most affordable and offer excellent drainage, but require occasional maintenance to replenish material. Concrete pads are the most durable and low-maintenance option, but are also the most expensive to install. Asphalt pads provide a smooth surface and moderate durability at a mid-range cost.
- Excellent drainage and permeability
- Most affordable initial cost
- Easy DIY installation possible
- Environmentally friendly option
- Requires occasional replenishment
Best for:Budget-conscious homeowners needing good drainage
- Maximum durability and stability
- Lowest long-term maintenance
- Smooth, level parking surface
- Highest upfront installation cost
- Permanent, non-permeable solution
Best for:Permanent installations with heavy usage
- Smooth, flexible surface
- Moderate cost and durability
- Good for cold climates
- Requires periodic sealing
- Can soften in extreme heat
Best for:Moderate budgets in variable climates
When an RV Pad Is the Best Solution
A gravel RV pad is ideal when you need a cost-effective solution that handles drainage well, especially in areas with heavy rainfall or poor soil drainage. It's perfect for seasonal RV owners or those who want a DIY-friendly project that can be expanded or modified later. Gravel pads work well for temporary or semi-permanent installations where you might need to relocate the pad in the future. They're also excellent for environmentally conscious homeowners who want a permeable surface that reduces runoff.
Everything You Need to Build an RV Pad
Building an RV pad requires a few key materials and tools to create a stable, layered foundation. You'll need foundational materials like road base and surface materials like crushed stone to ensure proper drainage and weight distribution. Essential tools include excavation and compaction equipment to properly prepare the site and install each layer.
- Road base, Crushed stone, Landscape fabric (optional), Edging
- Shovel, Rake, Plate compactor, String line and stakes, Laser level or transit
- Hello Gravel (materials), A contractor supply store, Local equipment rental (compactor)
What to Consider Before You Start
Before breaking ground, consider these key planning factors to ensure your RV pad project goes smoothly and lasts for years.
- Site selection and size
Choose a level location with proper drainage and ensure the pad dimensions accommodate your RV's length, width, and turning radius.
- Local regulations and permits
Check with your local building department for any required permits, setback requirements, or zoning restrictions for RV pads.
- Soil testing and preparation
Test soil composition and stability to determine if additional subgrade preparation or drainage solutions are needed.
- Utility line location
Call 811 or your local utility locating service to mark underground lines before any excavation begins.
- Material quantity calculation
Calculate the exact amounts of road base and crushed stone needed based on your pad dimensions and layer thickness requirements.
How to Prepare the Ground for an RV Pad
Start by clearing the area of all vegetation, debris, and any large rocks to create a level base. Mark the pad's perimeter with stakes and string, then grade the ground to achieve a gentle slope for drainage, typically 1–2% away from any structures. Finally, thoroughly compact the exposed subgrade using a plate compactor to create a firm, stable foundation that prevents future settling.
How an RV Pad Works
A well-built RV pad functions as a multi-layered system that distributes the vehicle's heavy weight across a broad area, preventing concentrated loads from causing ruts or failure. The compacted subgrade and road base layers work together to bear and spread the load, while the permeable crushed stone surface allows rainwater to drain through rather than pool. The slight crown built into the surface directs water to the sides, ensuring runoff flows away from the pad to maintain stability and prevent erosion or frost heave.
How to Install an RV Pad
Clear & Mark Area
Remove all vegetation and debris, then outline the exact pad dimensions with stakes and string.
Excavate & Grade Subgrade
Dig out the topsoil to the required depth and grade the exposed earth to create a slight slope for drainage.
Compact the Subgrade
Use a mechanical plate compactor to thoroughly compact the soil, creating a solid, unyielding foundation.
Add & Compact Road Base
Spread a layer of road base material evenly across the area and compact it to form a stable load-distributing layer.
Spread Crushed Stone Surface
Apply the final layer of crushed stone, raking it to achieve a uniform depth and the desired crown for water runoff.
Compact the Surface Layer
Compact the crushed stone with a plate compactor to lock the aggregate in place and create a firm, smooth driving surface.
Alternative Gravel Options for RV Pads
When building an RV pad, homeowners have several aggregate options, each with different performance characteristics. Crushed stone is the most common choice for the surface layer due to its excellent load-bearing capacity and ability to interlock for stability. While alternatives like road base work well for the base layer, and sand can aid in leveling, crushed stone provides the durable, smooth surface needed to support heavy vehicles. For a permanent, low-maintenance pad, crushed stone is the clear winner.
The best choice for the surface layer due to its superior load-bearing and interlocking properties.
View Product →Ideal for the compacted base layer to provide weight distribution and prevent settling.
View Product →A permanent, high-strength option but requires professional installation and is costly.
View Product →Useful for leveling and drainage in the subgrade but lacks structural strength alone.
View Product →Decorative and drains well but shifts under heavy loads and is unsuitable for RV pads.
View Product →Common RV Pad Mistakes (And How to Avoid Them)
Even with the right materials, RV pads can fail due to preventable installation errors. Avoiding these common mistakes ensures your pad remains stable and functional for years.
- Insufficient base depth
- Poor drainage planning
- No crown for runoff
- Inadequate compaction
- Wrong surface material
How to Maintain an RV Pad
Regular maintenance keeps your RV pad in top condition. Annually inspect for settling or potholes and add fresh crushed stone as needed to maintain a smooth surface. Ensure drainage channels remain clear of debris to prevent water pooling, and re-grade any areas that have developed low spots to maintain proper runoff.
Calculate How Much Gravel You Need
Enter Your Dimensions
Measure your project area and we'll calculate how much material you need.