Shed Base Gravel: Road Base Depth & Tonnage by Shed Size
A sturdy shed base is essential for protecting your investment against shifting ground and moisture damage. This guide explains what a shed base is, which materials you need, how to prepare the ground, how to build a gravel shed base step by step, and how to estimate the amount of gravel required. Whether you are planning a simple DIY shed pad or comparing gravel vs concrete, use the sections below to jump to the information you need.
See How to Build a Shed Base
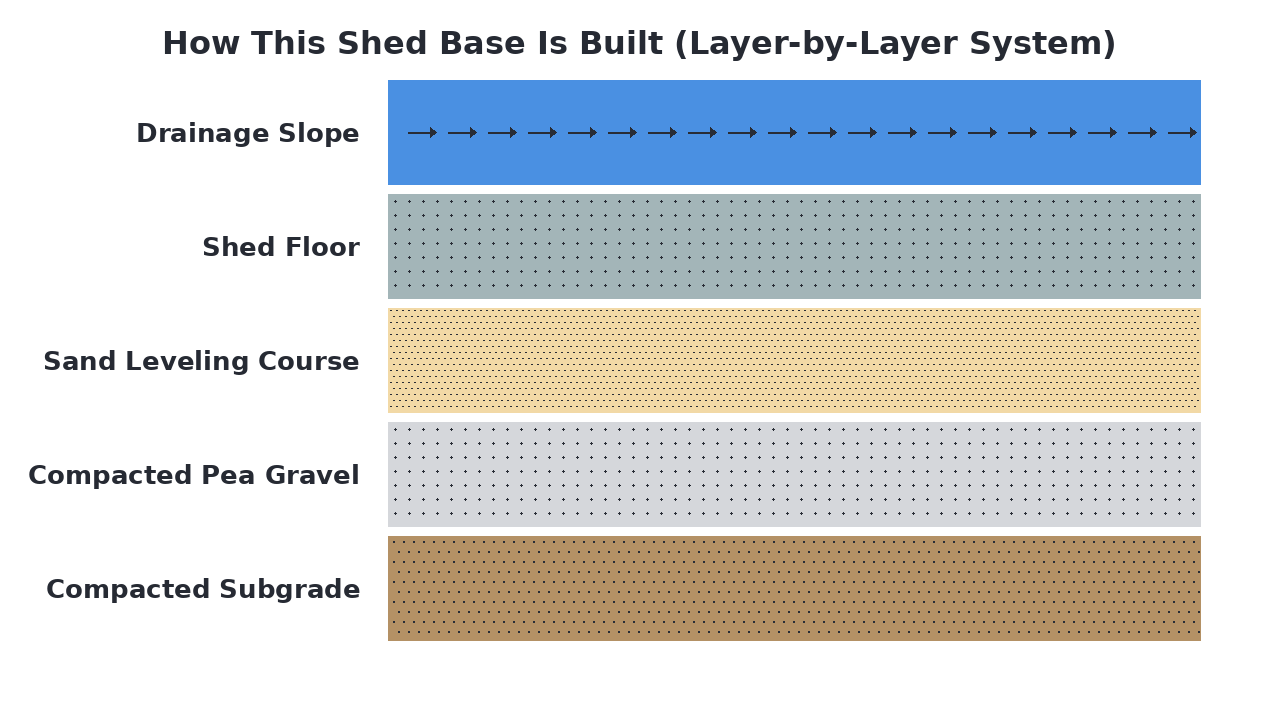
This visual guide illustrates the step-by-step installation sequence for building a sturdy shed base, showing how each layer from compacted subgrade to the final shed floor is constructed. It helps clarify the proper order of operations and the critical drainage slope needed for long-term stability and water runoff.

Gravel for Shed Bases: Best Materials, Depth, Cost & How to Build
A properly constructed shed base creates a stable, level foundation that prevents settling and water damage to your shed. We recommend using 3/4 inch crushed stone compacted to a 4-6 inch depth, which provides excellent load-bearing support and drainage. The crushed stone base should be topped with a sand leveling course to create a perfectly smooth surface for your shed floor. This layered system ensures long-term durability and protection against ground moisture and frost heave.
How This Shed Base Is Built (Layer-by-Layer System)
A shed base is built as a layered system designed to create a stable, level, and well-draining foundation. The system starts with compacted soil, followed by a layer of compacted gravel that provides load-bearing support and drainage. A final sand layer creates a smooth, level surface for the shed to sit on, preventing settling and water pooling. Proper compaction at each stage ensures the base remains solid and durable over time.
Materials Breakdown: What Each Layer Does
A shed base is constructed as a layered system, with each material serving a specific structural or drainage purpose. The layers work together to create a stable, level platform that prevents settling, manages moisture, and supports the shed's weight evenly. Choosing the right product for each layer ensures long-term durability and proper water runoff.
Native Soil
The existing ground that is compacted to form a firm, stable foundation that resists shifting and settling under the load.
Pea Gravel
A layer of small, rounded stones that provides excellent drainage and frost resistance while creating a stable base for the leveling course.
View Pea Gravel →Sand
A fine-grained material that is screeded to create a perfectly level surface for the shed floor to rest on.
View Sand →Concrete
The solid slab or pad that forms the actual floor of the shed, providing a durable, flat surface that supports the structure and its contents.
View Concrete →Surface Crown
A slight slope built into the surface that directs rainwater away from the shed foundation to prevent pooling and moisture damage.
What Is a Shed Base and Why Does It Matter?
A shed base is the bed of compacted gravel under your shed that keeps it level, dry, and rot-free. It's the simplest, most DIY-friendly project on this list — a 4–6 inch layer of compacted road base, leveled, will keep an 8 ft × 10 ft shed sitting flat for years. The alternative (placing the shed straight on dirt or grass) leads to a damp, settling, rotting floor — which is what this project exists to prevent.
Common Types of Shed Base Systems
Shed bases can be built using several different foundation systems, each with distinct characteristics. Gravel-and-sand bases offer excellent drainage and flexibility, while concrete slabs provide maximum permanence and load capacity. Wooden skids create a simple elevated platform, and plastic grid systems offer modern modular installation.
- Excellent natural drainage
- Easy DIY installation
- Flexible for future adjustments
- Cost-effective material choice
- Allows for relocation
Best for:Most residential shed installations
- Maximum stability and permanence
- Highest weight capacity
- Professional installation recommended
- Poor drainage if not sloped
- Difficult to remove
Best for:Large or heavy equipment sheds
- Simple elevated platform
- Minimal ground preparation needed
- Susceptible to rot over time
- Limited to smaller sheds
- Requires level ground
Best for:Temporary or seasonal shed setups
- Modular interlocking design
- Excellent drainage channels
- Lightweight and portable
- Higher upfront cost
- Limited size options
Best for:Modern eco-conscious installations
When a Shed Base Is the Best Solution
A gravel-and-sand shed base is ideal when you need reliable drainage to prevent water damage and rot in damp climates. It's perfect for DIY homeowners who want a cost-effective solution that allows for future shed relocation or adjustments. This system works well for most standard-sized storage sheds that don't require the extreme weight capacity of a concrete slab.
Everything You Need to Build a Shed Base
Building a sturdy shed base requires several key materials to create a stable, layered foundation. You'll need a compactable subgrade material like crushed stone for the bottom layer, followed by pea gravel for drainage and a sand leveling course for final surface preparation. Essential tools include excavation and compaction equipment, plus grading tools to ensure proper slope and levelness.
- Crushed stone, Pea gravel, Sand, Landscape fabric
- Shovel, Rake, Hand tamper or plate compactor, Level, String line and stakes, Wheelbarrow
- Your local hardware store, Hello Gravel (materials), Equipment rental store (compactor)
What to Consider Before You Start
Before breaking ground, consider these key planning steps to ensure your shed base is properly sized, located, and constructed for long-term stability.
- Site selection and preparation
Choose a level, well-drained location and clear vegetation, rocks, and debris from the area.
- Shed size and base dimensions
Measure your shed footprint and plan the base to extend at least 6 inches beyond all sides for proper support.
- Local building codes and permits
Check with your local municipality for any required permits or regulations regarding shed placement and construction.
- Drainage and slope planning
Determine the necessary slope (typically ¼ inch per foot) away from structures to ensure proper water runoff.
- Material quantity calculation
Calculate the volume of crushed stone, pea gravel, and sand needed based on your base dimensions and layer thicknesses.
How to Prepare the Ground for a Shed Base
Start by clearing the area of all vegetation, roots, and debris to create a clean workspace. Mark the shed's footprint with stakes and string, ensuring it's square and slightly larger than the final base. Excavate the marked area to a depth that accommodates all base layers, then grade the subsoil to create a slight slope for drainage away from the shed location. Finally, thoroughly compact the exposed subgrade with a plate compactor to create a firm, stable foundation for the gravel layers.
How a Shed Base Works
The shed base functions as a multi-layered system where each material serves a specific purpose. The compacted pea gravel layer provides primary drainage and load distribution, preventing water accumulation under the shed. A sand leveling course creates a perfectly flat surface for the shed floor while allowing minor adjustments. The overall slope ensures water runoff away from the structure, protecting the shed from moisture damage and foundation settling over time.
How to Install a Shed Base
Excavate & Compact Subgrade
Dig out the marked area to the required depth and compact the exposed soil thoroughly.
Add & Compact Pea Gravel
Spread a layer of pea gravel over the compacted subgrade and compact it to create a stable drainage layer.
Install Sand Leveling Course
Add a layer of sand on top of the compacted gravel and screed it to create a perfectly level surface.
Place Shed Floor
Position the shed floor assembly on the leveled sand base, ensuring it's properly aligned and supported.
Verify Drainage Slope
Check that the completed base maintains the proper slope away from the shed for effective water runoff.
Alternative Gravel Options for Shed Bases
While pea gravel and sand are common choices for shed bases, crushed stone and concrete offer superior stability and drainage. Crushed stone with angular edges locks together to create a firm, non-shifting foundation that resists settling under heavy loads. Pea gravel's smooth, rounded shape makes it prone to movement, while sand can wash away or compact unevenly over time. For most shed base applications, a well-graded crushed stone provides the optimal balance of drainage, compaction, and load-bearing capacity.
Angular edges lock together for maximum stability and drainage in shed bases.
View Product →Provides a permanent, solid foundation but requires professional installation and proper curing.
View Product →Smooth, rounded stones shift easily under weight, making them unsuitable for structural support.
View Product →Useful as a leveling layer beneath crushed stone but not as a standalone base material.
View Product →A compactable mixture of gravel and fines that creates a stable, load-bearing surface.
View Product →Common Shed Base Mistakes (And How to Avoid Them)
Even with the right materials, a shed base can fail if common installation errors aren't avoided. These mistakes often lead to settling, water damage, or structural issues over time.
- Insufficient base depth
- Poor drainage planning
- Inadequate compaction
- No weed barrier
- Using wrong aggregate type
How to Maintain a Shed Base
Regular maintenance ensures your shed base remains level and functional for years. Inspect the perimeter for settling or erosion after heavy rains, and add additional crushed stone to low spots to maintain proper drainage away from the shed. Clear any debris or vegetation that could trap moisture against the base, and check that the gravel hasn't shifted or compacted unevenly under the shed's weight. A well-maintained base prevents water damage and keeps your shed structurally sound.
Calculate How Much Gravel You Need
Enter Your Dimensions
Measure your project area and we'll calculate how much material you need.