Mailbox Post Gravel: Road Base for a Stable Mounting Hole
A sturdy mailbox post depends on proper materials and a solid installation to withstand weather and daily use. This guide explains what a mailbox post is, which materials you need, how to prepare the ground, how to build and install it step by step, and how to estimate the amount of gravel required. Whether you are replacing an old post or installing a new one for the first time, use the sections below to find what you need.
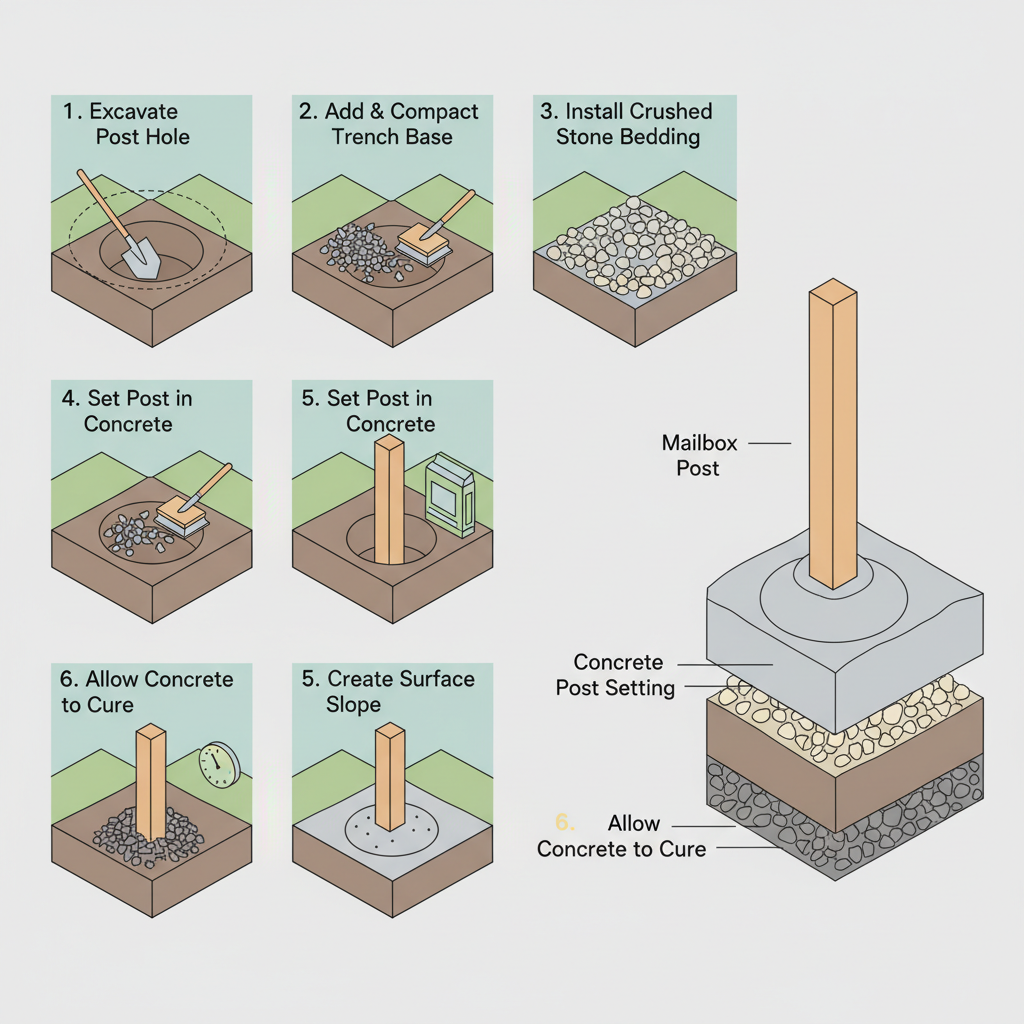
See How to Build a Mailbox Post
This visual guide shows the complete installation sequence for a durable mailbox post, from excavation to curing. The numbered steps clarify the proper order of operations, while the layered cross-section reveals how each material—compacted base, crushed stone, and concrete—contributes to stability and drainage.
Gravel for Mailbox Posts: Best Materials, Depth, Cost & How to Build
A mailbox post stays straight when it's set in a 12–18 inch deep hole packed with compacted road base, not just loose dirt. Plan on roughly 0.25–0.5 cubic yards (about 0.4–0.8 tons) of road base for a single post — enough to support the post and let frost-heave water drain away from the buried section.
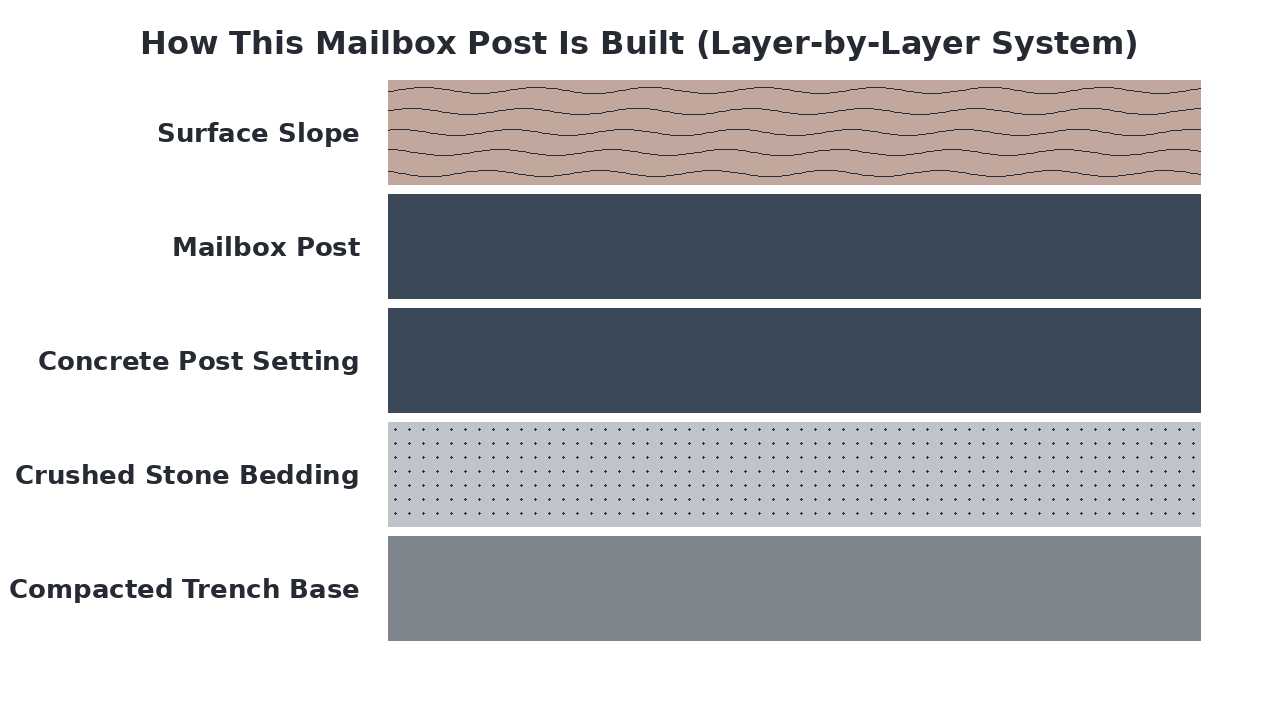
How This Mailbox Post Is Built (Layer-by-Layer System)
A mailbox post is built as a layered system designed to provide a stable, long-lasting foundation that resists frost heave and soil movement. The system starts with a compacted trench base, followed by a layer of Crushed Stone that creates a well-draining bedding to prevent water from pooling around the post. The post is then set in concrete within the stone layer, ensuring a rigid connection that can withstand wind and accidental impacts. A slight slope away from the post on the surface layer helps shed water and protect the foundation from erosion.
Materials Breakdown: What Each Layer Does
A sturdy mailbox post installation relies on a compacted gravel base, where each material serves a distinct structural purpose. The layers work together to provide a stable base that resists frost heave, supports the post's weight, and ensures proper water drainage away from the concrete. Choosing the correct product for each layer is crucial for long-term stability and preventing leaning or sinking.
Compacted Subsoil
The native soil at the bottom of the trench, compacted to create a firm, stable foundation that prevents settling and supports the layers above.
Crushed Stone
A layer of clean, angular crushed stone that provides drainage beneath the concrete, preventing water from pooling and reducing frost heave pressure.
View Crushed Stone →Concrete
A concrete collar poured around the post base to lock it in place, providing the primary structural support and anchoring the post securely.
View Concrete →Mailbox Post
The vertical post itself, typically made of wood or metal, which supports the mailbox and is secured by the concrete setting.
Surface Slope
The gentle slope of the finished ground surface away from the post that directs surface water runoff, preventing erosion around the base.
What Is a Mailbox Post and Why Does It Matter?
A mailbox post needs a small pad of compacted road base under and around the buried section so it doesn't tilt after the first frost. Plan on a 12–18 inch deep hole filled with about a quarter to a half cubic yard of road base, compacted in lifts as you backfill. Posts dropped straight into dirt are the ones that lean — water freezes around them in winter and shoves them sideways.
Common Types of Mailbox Post Systems
Mailbox posts typically use either gravel, concrete, or a combination system. Gravel-only posts offer basic drainage but lack structural stability for long-term use. Concrete-only posts provide maximum rigidity but can crack with frost movement. Hybrid systems combine materials for optimal performance, using gravel for drainage and concrete for anchoring.
- Simple DIY installation
- Good natural drainage
- Lowest material cost
- Prone to shifting
Best for:Temporary or low-budget solutions
- Maximum structural rigidity
- Permanent anchoring solution
- Resists heavy impacts
- Can crack with frost
Best for:High-traffic commercial settings
- Optimal drainage with stability
- Resists frost heave movement
- Long-term durability
- Professional-grade results
Best for:Most residential mailbox installations
When a Mailbox Post Is the Best Solution
A gravel and concrete hybrid mailbox post is ideal when you need lasting stability without drainage problems. Choose this system if you experience freeze-thaw cycles, have heavy clay soil, or want to prevent leaning over time. It's perfect for homeowners who want a one-time installation that withstands weather, accidental impacts, and soil movement for years.
Everything You Need to Build a Mailbox Post
A durable mailbox post requires specific materials for each foundational layer to ensure stability and proper drainage. You'll need crushed stone for bedding, concrete for setting the post, and gravel or sand for the trench base. Essential tools include a post hole digger, level, and mixing equipment for the concrete.
- Compacted gravel or sand trench base, Crushed stone bedding, Concrete mix, Mailbox post
- Post hole digger, Shovel, Level, Concrete mixing tub or wheelbarrow, Tamping tool
- Hello Gravel (materials), A contractor supply store, Local equipment rental (post hole digger if needed)
What to Consider Before You Start
Before digging, consider these key factors to ensure a compliant and long-lasting installation.
- Local mailbox regulations
Check with your local post office or municipality for height, setback, and construction requirements.
- Underground utility locations
Call 811 or your local utility marking service to locate any buried lines before digging.
- Soil drainage conditions
Assess the soil type and drainage patterns to determine proper foundation depth and drainage needs.
- Post alignment and orientation
Plan the exact placement to ensure the mailbox faces the road correctly and is accessible to mail carriers.
How to Prepare the Ground for a Mailbox Post
Start by clearing the area of all vegetation, rocks, and debris where the post will be installed. Mark the exact post location and dig a hole approximately 24 inches deep and 12 inches wide, ensuring the sides are straight. Grade the bottom of the hole flat and create a slight slope away from the post location for future water drainage. Finally, compact the soil at the bottom of the hole to create a firm, stable base for the foundation layers.
How a Mailbox Post Works
The installation functions as a layered foundation system that distributes the mailbox's load and prevents frost heave. A compacted trench base provides initial stability, while the crushed stone bedding acts as a drainage layer to channel water away from the concrete. The concrete post setting anchors the post firmly and transfers weight downward, while the surface slope ensures rainwater runs off instead of pooling around the base. Together, these components create a durable, long-lasting support that resists leaning, sinking, and weather-related damage.
How to Install a Mailbox Post
Excavate Post Hole
Dig a hole to the required depth and width, ensuring straight sides and a level bottom.
Add & Compact Trench Base
Fill the bottom of the hole with several inches of compactable material and tamp it down firmly.
Install Crushed Stone Bedding
Add a layer of crushed stone on top of the compacted base to improve drainage.
Set Post in Concrete
Place the mailbox post in the center of the hole and pour concrete mix around it, leaving the top slightly above ground.
Create Surface Slope
Shape the concrete around the post so it slopes downward away from the base to direct water runoff.
Allow Concrete to Cure
Let the concrete set completely according to manufacturer instructions before attaching the mailbox.
Alternative Gravel Options for Mailbox Posts
Homeowners have several aggregate options for creating a stable base for a mailbox post, each with different properties affecting drainage, compaction, and frost resistance. Crushed stone and concrete provide excellent load-bearing capacity and drainage, while sand offers easy leveling but less structural support. For most installations, a well-graded crushed stone like #57 is the best choice because it locks together tightly, resists shifting, and ensures long-term stability without settling.
A cost-effective recycled option that provides good stability and drainage.
View Product →Used for the post footing to create a solid, permanent anchor.
Suitable for leveling and bedding layers beneath the main base.
Decorative only; lacks compaction and stability for structural support.
View Product →Common Mailbox Post Mistakes (And How to Avoid Them)
Even a simple mailbox post installation can fail prematurely if common errors are made during the foundation and assembly process. Avoiding these mistakes ensures your post stays upright and functional for years.
- Insufficient hole depth
- Poor drainage around base
- Inadequate concrete coverage
- Using decorative gravel as base
- Not tamping base layers
How to Maintain a Mailbox Post
Regularly inspect the base of your mailbox post for signs of settling or erosion, especially after heavy rains or freeze-thaw cycles. Re-grade any washed-out gravel and add fresh crushed stone as needed to maintain proper drainage away from the concrete footing. Check that the post remains plumb and tighten any loose hardware to prevent wobbling or leaning over time.
Calculate How Much Gravel You Need
Enter Your Dimensions
Measure your project area and we'll calculate how much material you need.