Window Well Drain Rock: Gravel Sizing & Depth Guide
A well-designed window well is essential for protecting your basement from water damage and ensuring proper egress. This guide explains what a window well is, which materials you need, how to install it step by step, how to maintain it effectively, and how to estimate the amount of gravel required. Whether you are replacing an old, failing window well or installing one for the first time, use the sections below to find what you need.
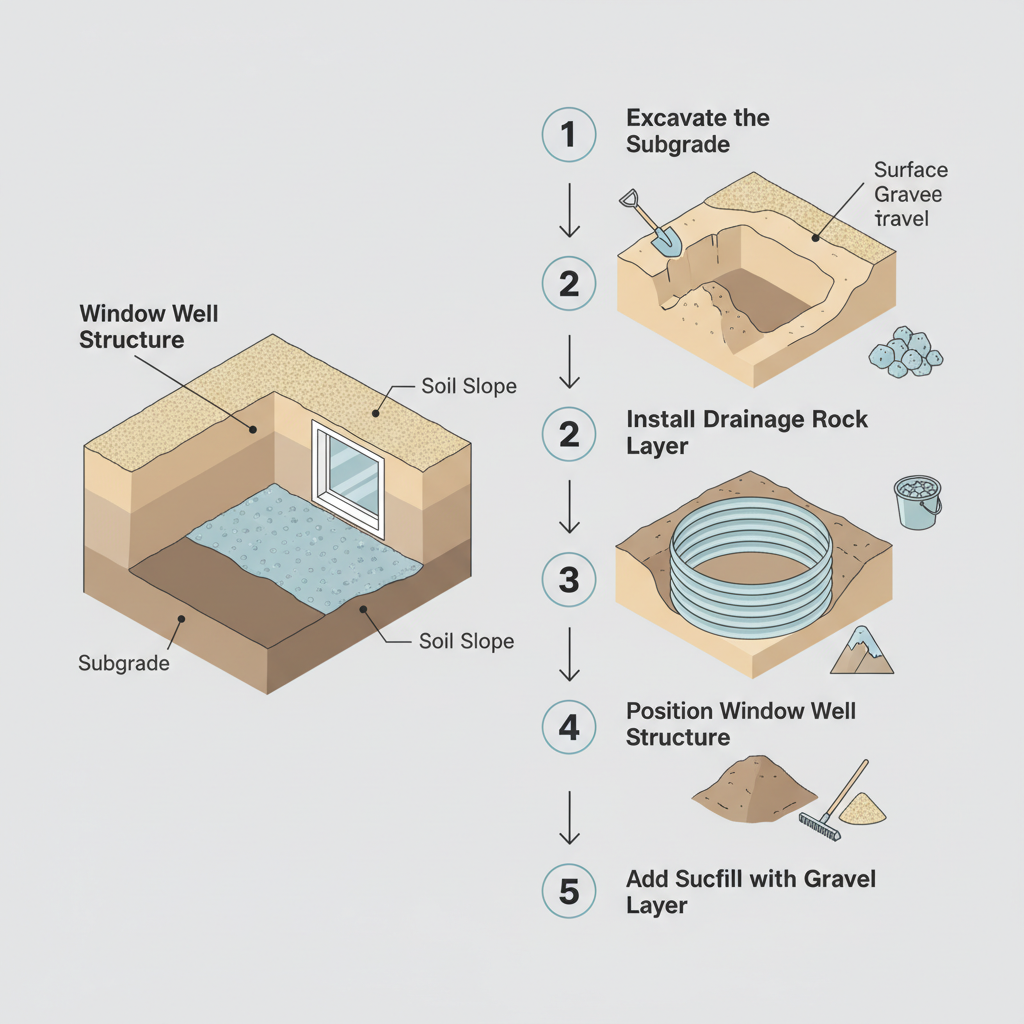
See How to Build a Window Well
This visual guide shows the complete installation sequence for building a window well, from excavation to final gravel layer. It clarifies both the step-by-step process and the layered structure of subgrade, drainage rock, window well, soil slope, and surface gravel, helping you understand how each component works together for proper drainage and installation.
Gravel for Window Wells: Best Drainage Rock, Depth & Installation Guide
A window well is a critical drainage system that protects basement windows from water damage and flooding. We recommend using 3/4 to 1 1/2 inch drainage rock as the base layer, installed 6-8 inches deep to ensure proper water percolation. A 6-10 inch surface gravel layer completes the system, directing runoff away from the foundation. This layered approach prevents hydrostatic pressure buildup and keeps your basement dry year-round.
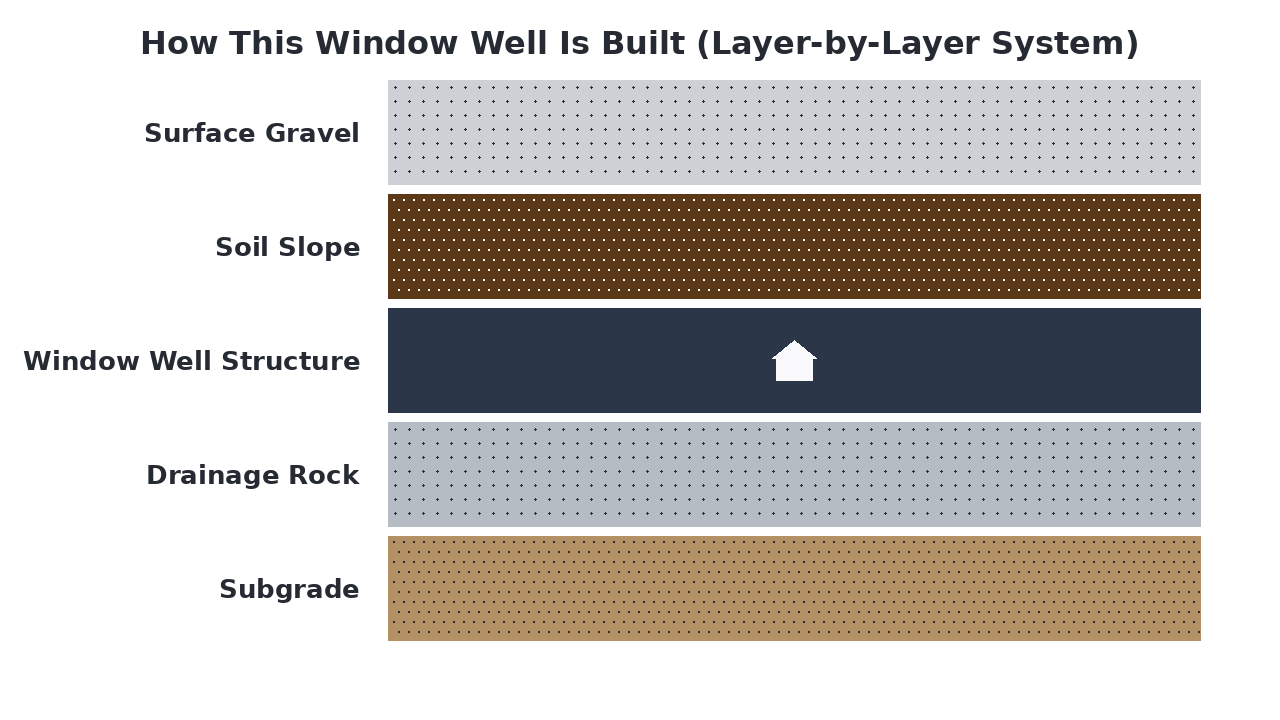
How This Window Well Is Built (Layer-by-Layer System)
A window well is a layered drainage system designed to keep water away from basement windows and prevent flooding. The bottom layer consists of drainage rock that allows water to percolate down and away from the foundation, preventing hydrostatic pressure buildup. Proper compaction of the surrounding soil and a sloped gravel layer ensure surface runoff doesn't accumulate near the window opening, protecting the foundation from water damage.
Materials Breakdown: What Each Layer Does
A window well drainage system uses layered materials to manage water effectively around basement windows. Each component serves a specific purpose, from creating a stable foundation to directing water away from the window structure. The layers work together to prevent water accumulation, protect the window well, and ensure proper drainage while maintaining a clean appearance.
Compacted Subgrade
The prepared and compacted native soil that forms the stable foundation for the entire drainage system.
Drainage Rock
Clean, angular crushed stone that creates voids for water to drain quickly away from the window well structure.
Window Well Structure
The metal or plastic well that protects the basement window and provides structural support for the surrounding layers.
Graded Soil Slope
The angled soil layer that directs surface water away from the window well toward the surrounding landscape.
Pea Gravel
Small, rounded decorative gravel that provides a finished appearance while allowing water to filter through to the drainage layer below.
View Pea Gravel →What Is a Window Well and Why Does It Matter?
A window well is a graded excavation and drainage system installed around basement windows to prevent water infiltration and flooding. It matters because proper window well construction protects your foundation from water damage, prevents mold growth, and maintains basement air quality. Unlike simple gravel pits, a properly engineered window well uses layered materials including drainage rock and surface gravel to manage both subsurface and surface water effectively.
Common Types of Window Well Systems
Window well systems vary primarily in their drainage approach and material composition. The most basic type uses simple gravel fill around the window, while more advanced systems incorporate layered drainage materials. Engineered systems with proper drainage layers provide superior water management compared to basic gravel pits.
- Simple installation
- Lowest cost option
- Limited drainage capacity
- Prone to clogging
Best for:Temporary or low-budget solutions
- Layered drainage materials
- Superior water management
- Prevents foundation damage
- Long-lasting protection
Best for:Permanent basement protection
- Quick installation
- Uniform appearance
- Limited drainage options
- May crack over time
Best for:New construction projects
- Very durable construction
- Excellent structural support
- Expensive installation
- Limited drainage design
Best for:Historic or high-end homes
When a Window Well Is the Best Solution
An engineered window well drainage system is the best solution when you need reliable, long-term protection against basement flooding and foundation damage. Choose this option if you have persistent drainage issues, live in an area with heavy rainfall, or want to prevent mold growth in your basement. It's also ideal for homeowners planning to finish their basement space or who value permanent water management solutions over temporary fixes.
Everything You Need to Build a Window Well
Building a window well drainage system requires foundational materials to create a stable base and surface materials to manage water and appearance. You'll need excavation and grading tools to prepare the subgrade and shape the soil slope. Proper compaction tools are also essential to ensure each layer is stable and functions correctly for long-term drainage.
- Sand, Drainage Rock, Window Well Structure, Soil, Pea Gravel
- Shovel, Rake, Hand tamper or plate compactor, Level, Tape measure
- Hello Gravel (materials), Your local hardware store, A contractor supply store
What to Consider Before You Start
Before you start digging, consider these key planning steps to ensure your window well functions properly and meets local requirements.
- Local building codes
Check with your local building department for any permits or specific requirements regarding window well depth, size, and drainage.
- Existing drainage patterns
Observe how water flows around your foundation during rain to determine the best location and orientation for the window well.
- Window well size and type
Measure your basement window dimensions and choose a window well structure that provides adequate clearance and meets egress requirements if needed.
- Soil composition and stability
Assess the soil type around your foundation to determine if additional stabilization or different excavation techniques are needed.
- Downspout and gutter integration
Plan how to redirect downspout water away from the window well area to prevent overwhelming the drainage system.
How to Prepare the Ground for a Window Well
To prepare the ground for a window well, first clear the area of all vegetation, roots, and debris from around the basement window. Mark the excavation perimeter using stakes and string, ensuring it extends at least 12 inches beyond the window well's planned dimensions. Grade the subgrade to create a slight downward slope away from the foundation for initial water runoff. Finally, compact the soil using a hand tamper or plate compactor to create a stable, level base for the drainage layers.
How a Window Well Works
A window well drainage system functions through layered materials that manage water flow and protect the basement window. The compacted subgrade provides a stable foundation, while the drainage rock layer creates a permeable zone that collects and redirects groundwater away from the structure. The window well itself acts as a retaining barrier, with the sloped soil directing surface water toward the drainage layer. Surface gravel completes the system by allowing water infiltration while preventing soil erosion and maintaining a clean appearance.
How to Install a Window Well
Excavate the Subgrade
Dig out the marked area to the required depth, creating a stable foundation layer that slopes away from the foundation.
Install Drainage Rock Layer
Place and level a 4-6 inch layer of drainage rock in the excavated area to create a permeable base for water collection.
Position Window Well Structure
Set the window well structure into place against the foundation, ensuring it sits securely on the drainage rock layer.
Backfill with Soil Slope
Fill around the window well with soil, creating a gentle slope that directs surface water toward the drainage layer.
Add Surface Gravel Layer
Spread a 2-3 inch layer of pea gravel or decorative gravel over the soil to complete the drainage system and improve aesthetics.
Alternative Gravel Options for Window Wells
For window well drainage, several aggregate options can be used, each with different drainage and stability characteristics. Pea gravel provides excellent drainage but may shift over time, while crushed stone offers better stability but less optimal water flow. Drainage rock typically emerges as the best choice because it balances effective water movement with enough angularity to stay in place without clogging.
Ideal for window wells due to its angular shape that promotes drainage while preventing settling.
View Product →Provides good drainage but can shift easily and may allow fine sediment to accumulate.
View Product →Offers stability but may compact over time, reducing drainage efficiency.
View Product →Poor choice as it compacts easily and impedes water flow, leading to pooling.
View Product →Decorative but smooth surfaces can hinder drainage and allow soil infiltration.
View Product →Common Window Well Mistakes (And How to Avoid Them)
Proper window well installation requires attention to detail to prevent water intrusion and structural issues. Here are the most frequent errors homeowners make when setting up their drainage systems.
- Insufficient drainage layer
- Wrong aggregate type
- Poor grading
- Clogged weep holes
- Inadequate depth
How to Maintain a Window Well
Regular maintenance of your window well ensures continued proper drainage and prevents basement water issues. Inspect the gravel layer annually, removing any debris or sediment that has accumulated. Replenish the drainage rock if it has settled significantly, and ensure the surrounding soil is graded away from the well to direct water flow. Check and clear any weep holes or drainage pipes to maintain optimal water movement.
Calculate How Much Gravel You Need
Enter Your Dimensions
Measure your project area and we'll calculate how much material you need.